Before anything is posted here, you can download virtualbox or VMware & also download Cloudera image for BigData practise on your local.
Then you can deploy that image on your virtualbox or VMWare, and you are ready to do some hands-on for Hadoop/bigdata.
Like as suggested above to have cloudera image & virtualbox in your local machine to start using Hadoop/Spark on fly, but will suggest to use it if you have 8GB RAM & enough diskspace & I am using 2.8GHz QuadCore I7 processor with 16GB RAM. You might be using & exploring Hadoop/Spark like this, but many times we need to share the files between our local machine & VM. So below are the steps which I followed to share the files between my local machine & VM on virtualbox, hope it will help you to work -
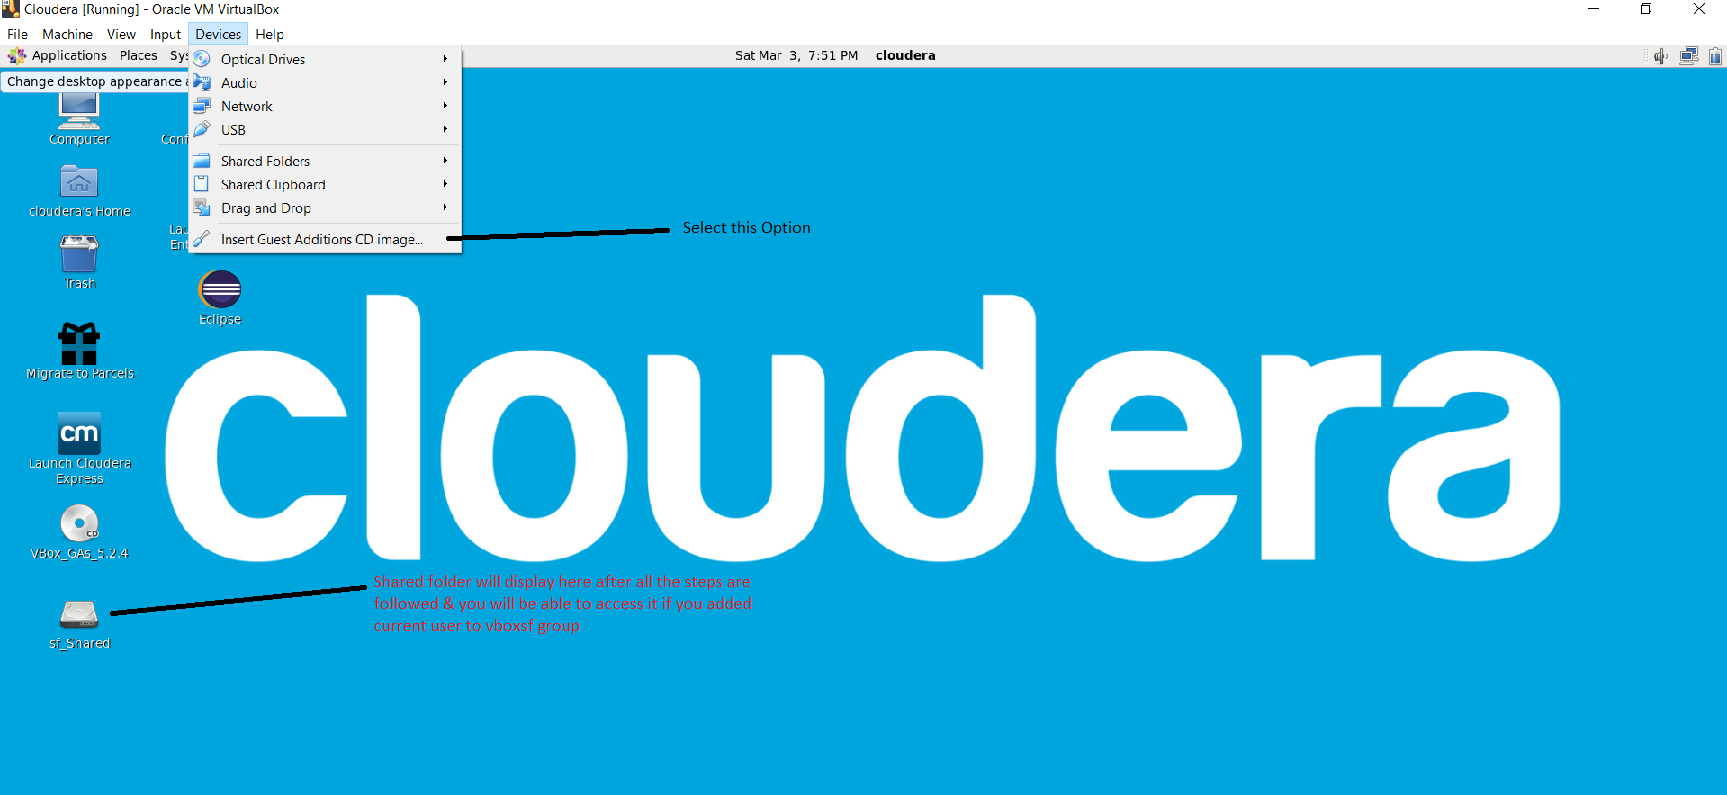
Select 'Insert Guest Additions CD image' and execute the autorun.sh file from the image created on desktop as shown in above image.
Now in windows or host OS, create one folder which will be shared with VM or guest OS.
And give the access to the shared folder to everyone.
Create shared folder from Devices -> Shared Folders. It is the same ‘Devices’ menu option as you selected above. And select the folder which you created in Windows & gave access to everyone.
Make the folder as permanent and auto mount by selecting the options at above window.
Then in guest os, open terminal & execute below command to add the current user to vboxsf group.
sudo usermod -aG vboxsf $(whoami)
Now restart or logout/login the guest OS.
Now you will get & access the shared folder on desktop of guest OS.
So now, you can check using below URLs, if you can access them successfully -
http://localhost:50070/
The default port number to access Hadoop is 50070.
http://localhost:8088/
The default port number to access all applications of cluster is 8088.
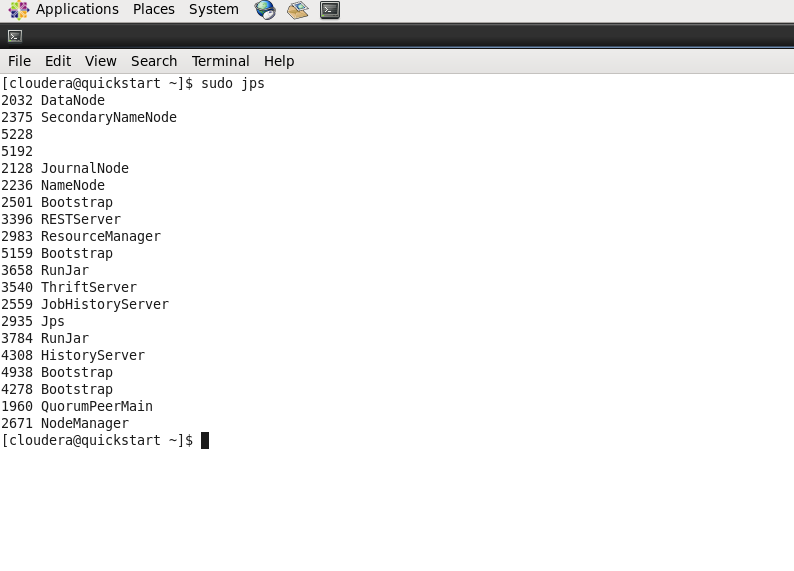
Like shown in below image, you can check if the required services are running using - sudo jps
on terminal.
Below are few URLs which I think can be helpful & will keep on adding here as I get-
www.bigdataanalyst.in/spark-advanced-interview-questions/
So you are all set to rock the VirtualBox with all your experiments.
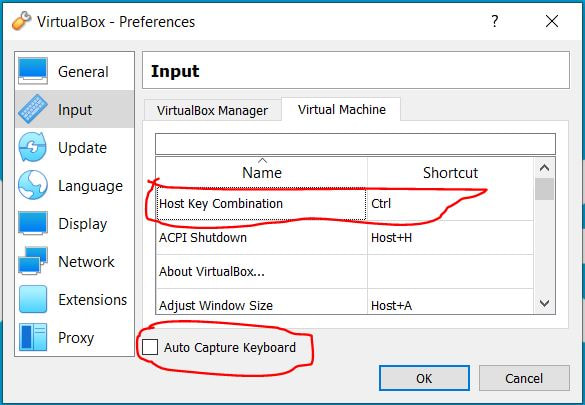
But many times we need to switch between our VirtualBox window to our main window, I am using Windows10 as the root OS here. If you see if you use Alt+Tab to switch the windows to your root OS, it doesn't work. It will do switching of windows in your VirtualBox only. Some will suggest you to disable the option as shown below -
But many times we need to switch between our VirtualBox window to our main window, I am using Windows10 as the root OS here. If you see if you use Alt+Tab to switch the windows to your root OS, it doesn't work. It will do switching of windows in your VirtualBox only. Some will suggest you to disable the option as shown below -
If you uncheck this option then VirtualBox will not capture Alt+Tab & you can switch to your Windows. But I need Alt+Tab to switch windows I have in VirtualBox. So I will not uncheck this option. Rather I changed the Host Key Combination to Ctrl i.e. Left Ctrl as per my convenience & keep Auto Capture Keyboard option checked. Now in VirtulaBox I use Alt+Tab & when I need to come to my Windows then I press Left Ctrl once & then use Alt+Tab to switch to Windows10.
There are many combinations you can try with Host key, please check the options.
You can get above window using -
a) File -> Preferences
b) Input -> Keyboard -> Keyboard Settings...
There are many combinations you can try with Host key, please check the options.
You can get above window using -
a) File -> Preferences
b) Input -> Keyboard -> Keyboard Settings...
===============================================================================================
Now you want to copy the data from your Windows machine to VirtualBox.
One way I have told at the top, another way is via WinScp or Putty or FileZilla, so you may face some issue to connect.
Just first check below article then follow other articles to use WinScp or Putty or FileZilla -
https://medium.com/@pravindev1/couldnt-connect-to-host-machine-via-winscp-cloudera-sandbox-issue-fixed-9bef59e37f65

Anyone working on HDFS or involved in Hadoop ecosystem then can have a look on Apache Ozone as explained below-
Introducing Apache Hadoop Ozone: An Object Store for Apache Hadoop - Cloudera Blog
Hadoop Ozone part 2: tutorial and getting started of its features | Adaltas
Introducing Apache Hadoop Ozone: An Object Store for Apache Hadoop - Cloudera Blog
Hadoop Ozone part 2: tutorial and getting started of its features | Adaltas


